With the popularity of the Suunto Ambits 3s and Traverse a few customers have been calling for help with some issues they are having setting up their watch and figuring out all the functionality.
There are some common themes running through most of the conversations I have had so I’ll try to address these in a simple FAQ.
The Suunto Ambit 3 Peak, Sport, Run and Vertical, and the Suunto Traverse and Traverse Alpha all run on essentially the same firmware with the same user interface. They all use the Suunto Movescount app so what will work for one watch will work across the range.
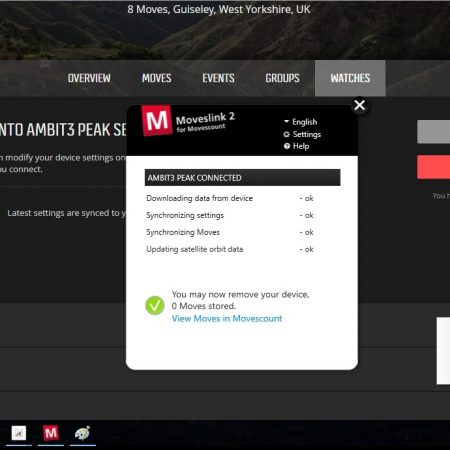
Before turning on your watch It’s best to download Suunto Moveslink to your PC or Mac and create a Movescount account. Once installed get Moveslink running and open your Movescount account in a browser window, then connect your watch to your PC or Mac using the USB cable provided. You should be presented with the options shown (1). I recommend updating the firmware before connecting your watch to Movescount. After selecting connect to Movescount you will be asked for your Movescount login details. Enter these and Moveslink will sync your watch to your Movescount account and you will see Screen (2). Congratulations your watch is now synced to your Movescount account and you can start fiddling with all the settings!
Pairing with your Mobile

The Suunto Movescount app is currently available for Android and iOS (iPhones) and can be found on the app store. Install the app on your phone and ensure Bluetooth is enabled to begin. Open Movescount on your phone enter to options menu and you will see the ‘’+ Watch’’Icon (1). Now hold the Next button on the watch to open the options menu, select Pair, then Mobile App. At the same time press +watch on the mobile app and the phone and watch will start searching for each other (2). Once they have done that the watch will display a passkey which you will be prompted to enter on your mobile. Once you have done this leave it a couple of minutes to sync. You can now see your colleagues abusive text messages on your Watch (3)!
My watch will not sync with my PC

You have connected your watch using the USB cable but the initial sync process with Moveslink is not completing. In the vast majority of cases this is caused by the firmware in your watch being out of date. If you are not presented with an option to update when connecting to Moveslink you will need to force a firmware update. To do this first ensure that your watch is connected properly and Moveslink is running. Open your hidden Icons at the bottom Right of your desktop (1) and right click on the Moveslink icon which will bring up the menu shown. Click force firmware update to begin (2). Unfortunately this will wipe any stored moves on your watch. Once completed your watch will sync correctly.
I want to maximize battery life for long hikes.
You have a multi day hike planned where you are going to be away from civilisation for a while but you would still like to record your route. To maximise your battery life you can change the GPS fix interval to 60s which will give you 200 hours of constant GPS use on the Ambit 3 Peak and 100 hours with the other Ambit 3s and Traverses. The easiest way to do this is through Movescount, Connect your watch to your PC and enter the watch setting. Select the Sport mode you would like to edit, click edit (1) and select the GPS accuracy (2) you would like. The corresponding battery life is also described. While in this menu you also customise the information you would like displayed on each screen while you are recording (3).
Changing your location to British BNG format.

By default the GPS coordinate system that your watch will use is WSG84 which isn’t really great help in the UK. The Ambit 3 or Traverse can be a really helpful nav tool if you are stuck out when the weather comes in and you lose all visibility. When this happens you will want your position in British BNG format so you can check your position on an Ordnance survey map.
First off hold the Next button for 2 seconds to enter the options menu. Then using the same Next button to select options, select General then Formats then Position Format. Then using the Light/Lock button to scroll down to British(BNG) and press the Next button to select it. That’s it, you are now good to go.
That’s the most common queries covered. If you would like to know anything further just get in touch.


